
The latest version of Nextcloud has been released with features that supercharge your collaborative efforts. Jack Wallen walks you through the installation process.

Image: DANIEL CONSTANTE/Shutterstock
The latest iteration of the Nextcloud on-premise cloud server has been released, and it focuses on knowledge management with a few new features that might well find their way to being your favorite. To make the collaboration workflow even easier, Nextcloud introduces Collectives, an app that makes it possible for users to share a set of “handbooks” with each other. This app is tied with a new group feature, Circles, which builds on the Nextcloud Text app.
SEE: From start to finish: How to deploy an LDAP server (TechRepublic Premium)
Collectives collects documents together, each shared with a different circle. Within those Collectives, you can create new pages, and those pages can have sub-pages that come together to structure a complete knowledge base.
Other improvements/additions to Nextcloud include:
- Integrated chat and task management.
- Easy approval workflow.
- Document signatures with integrated PDF signing.
- Integrated knowledge management.
- Trash bin feature in Calendar.
- Nextcloud Mail features improved threading, email tagging and support for Sieve filtering.
I’ll walk you through the process of installing Nextcloud 22 on Ubuntu Server 20.04, so you can deploy this outstanding cloud offering to your in-house (or cloud-provided) data center.
SEE: Kubernetes: A cheat sheet (free PDF) (TechRepublic)
What you’ll need
The only things you’ll need to make this work are:
- A running, updated instance of Ubuntu Server 20.04.
- A user with sudo privileges.
That’s it. Let’s get to work.
How to install the web and database servers
The first thing we’ll do is install the web and database servers. Log into your Ubuntu Server instance and issue the command:
sudo apt-get install apache2 mysql-server -y
When that completes, start and enable the servers with the following commands:
sudo systemctl start apache2
sudo systemctl enable apache2
sudo systemctl start mysql
sudo systemctl enable mysql
How to install the remaining dependencies
With the servers installed, let’s take care of the remaining dependencies. For that, issue the following command:
sudo apt-get install php zip libapache2-mod-php php-gd php-json php-mysql php-curl php-mbstring php-intl php-imagick php-xml php-zip php-mysql php-bcmath php-gmp zip -y
How to secure the MySQL server and create the database
We need to set a password for the MySQL admin user with the command:
sudo mysql_secure_installation
Give the MySQL admin user a strong/unique password and answer the remaining questions with y (for yes).
Next, we’ll log into the MySQL console with:
sudo mysql -u root -p
Create the new database with the command:
CREATE DATABASE nextcloud;
Create a new user with the command:
CREATE USER 'nextcloud'@'localhost' IDENTIFIED BY 'PASSWORD';
Where PASSWORD is a unique and strong password.
Give the new user the necessary permissions with the command:
GRANT ALL PRIVILEGES ON nextcloud.* TO 'nextcloud'@'localhost';
Flush the privileges and exit the console with the commands:
FLUSH PRIVILEGES;
exit
How to download and unpack the Nextcloud file
Download the latest version of Nextcloud with the command:
wget https://download.nextcloud.com/server/releases/nextcloud-22.0.0.zip
Unzip the downloaded file:
unzip nextcloud-22.0.0.zip
Move the newly created nextcloud directory to the Apache document root:
sudo mv nextcloud /var/www/html/
Give the Nextcloud folder the necessary ownership:
sudo chown -R www-data:www-data /var/www/html/nextcloud
How to configure Apache for Nextcloud
Create an Apache .conf file for Nextcloud with the command:
sudo nano /etc/apache2/sites-available/nextcloud.conf
In that file, paste the following:
Alias /nextcloud "/var/www/html/nextcloud/"
<Directory /var/www/html/nextcloud/>
    Options +FollowSymlinks
    AllowOverride All
      <IfModule mod_dav.c>
        Dav off
      </IfModule>
     SetEnv HOME /var/www/html/nextcloud
    SetEnv HTTP_HOME /var/www/html/nextcloud
</Directory>
Save and close the file.
Enable the new site with the command:
sudo a2ensite nextcloud
Enable the necessary Apache modules:
sudo a2enmod rewrite headers env dir mime
Finally, change the PHP memory limit:
sudo sed -i '/^memory_limit =/s/=.*/= 512M/' /etc/php/7.4/apache2/php.ini
Note: If your version of PHP is a different release than 7.4, you’ll need to alter the above command accordingly.
Restart Apache:
sudo systemctl restart apache2
How to finish the installation
Open a web browser and point it to http://SERVER/nextcloud (where SERVER is the IP address or domain of the hosting server in your data center). In the window presented (Figure A), create an admin user and fill out the required information as such:
- Database user: nextcloud
- Database password: The password you created for the nextcloud database user
- Database name: nextcloud
Figure A
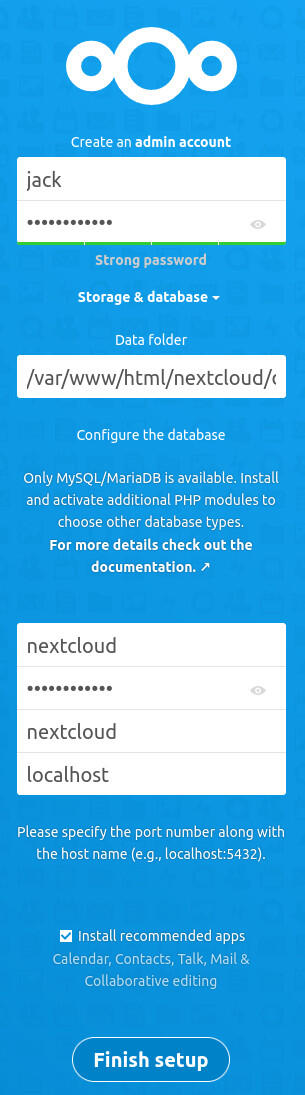
Finishing up the Nextcloud 22 installation via the web-based interface.
Click Finish Setup to complete the installation. You’ll find yourself logged in as the admin user, where you can start customizing your Nextcloud 22 instance.
Congratulations, you can now start working with the latest release of the finest on-premise cloud solution within your company data center.

Data Center Trends Newsletter
DevOps, virtualization, the hybrid cloud, storage, and operational efficiency are just some of the data center topics we’ll highlight.
Delivered Mondays and Wednesdays
Also see
Stay connected with us on social media platform for instant update click here to join our Twitter, & Facebook
We are now on Telegram. Click here to join our channel (@TechiUpdate) and stay updated with the latest Technology headlines.
For all the latest Technology News Click Here
For the latest news and updates, follow us on Google News.